Studio is closed, due to fire.

Sunday, August 28, 2011

Something borrowed....Lockhart stamps.


My last post is a big "Thank You!" going out to Pat Whitaker. She knew I had a love of Lockhart stamps and brought in several stamped images for me to color in. I spent most of the night at Late Create (when I wasn't eating), coloring. The next day was Scrapbooking Day, and since it was a quiet day I was able to color some more. Here is what I accomplished. By the time I made it to my third image, I had better coloring. Practice, practice, practice...then maybe I can do Intermediate COPIC certification.
Thanks again Pat!!

Late Create card creations.


We have a lovely group of ladies that come to our Late Creates. This time I actually remembered to get a couple of photos to share. One is a bit blurry, but too nice to not show the card.
These were made by Melody, Pat and Teresa. There were other lovely cards too, and I hope I can get several photos each time we meet. I have to mention the first card (with the heart image), was made using the new boys line of paper from TaDa. Now we were all amazed that Melody matched that to use for a feminine card. What a perfect color combo it is. I love it when things fall into place.
Our next Late Create is September 9th. So mark your calendars now.

Multi image punch idea...


I bought this punch awhile ago, to use in our studio. I must admit I never did get it out myself.
There is a corresponding stamp set that goes along with it (Stampin' Up! ), my "first stamping love". On Saturday Deb Rogers came in and got it out to use, so here was my chance. I wondered once (one of those early morning "aha" moments), if you could lay the stamps onto the back of punch to align them up better to punch the entire image at once. Here is what happened.
It is a pretty good way to use your card stock, so you aren't wasting so much with stamping one image and punching only that one image. If you doing leaves and petals at the same time, I would suggest the markers to color each their correct colors. For this sample I just used an ink pad and all the images were stamped the same color. Kind of cool experiment. For all you SU ladies out there, this one's for you!

Thursday, August 25, 2011

Finished edge and then page layout...


After doing the entire lace like edge, I thought it needed a color beneath to make it "pop". Then I remembered the Jillibean paper we have that looks like a quilt. Gorgeous color and pattern. In keeping with the sewing theme, I used another EK Success (line of buttons), edge punch and a single button punch from Martha Stewart. Not to find that photo of my daughter making her first quilt! Oh, and to order in another punch for me, so I don't have to keep borrowing the one Diane bought today. ha

Start with one punch, then turn to do the other side...


I rotated back and forth, punching one flower edge, then turning to punch the other side.
Then turning it back to first flower side and back to complete that flower. I did it this way to line up those tiny marks at top edge of the punch. You know the tiny silver lines going down into the punch from top edge (you use to know exactly where it's going to punch)? Not all of the punches have them, (and I only recently found them myself!)
If you don't do it back and forth, one flower at a time, you can punch all the way down one side.
When you turn it to the other side to punch that row, use those silver lines to line up the first punch, then follow the image alignment (like you normally would). Is that clear as mud?
Here are a couple more photos, hopefully to help out.

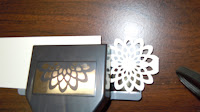
Flower Burst punch from EK Success


We had received this punch a few weeks ago and I was very curious about how it would punch out. It's one thing to look at the image on the punch, but it's better to actually see it used. But you know you just can't buy them all yourself. Lucky for me that Diane stopped in and bought it. While she did the M&T, I was allowed to "play". She wondered allowed if you could make an entire flower with it, since it was only half a flower edge punch. After a few attempts to get the right width of card stock to use, it was decided you would have to cut out the edges to get a complete flower.
As Diane is still doing M&T, she says again, "wonder how that would look if you punched it all the way down that length of card stock?" Oh, like lace I say. So, again I use the width of flower and made a long strip of card stock. (2 and 9/16th " x 12" ) Yes, very precise, so the smallest petal inside will match exactly all the way around the flower.

Wednesday, August 24, 2011

New line from TaDa Designs-Just Chillin - for boys.


Ok, one more close-up for the paper.


Do you have a hard time finding paper for male pages and cards? There are plenty of baby boy and toddler papers, but not many for teenagers.
We just received our first order from TaDa Designs. This is a line just for guys, but I'm sure some of it would work for other themes too. It's called Just Chillin, and I have a photo of some of the papers and stickers. Isn't it rad?! Ok, that did not sound like me, and I'm sure my son would tell me that word is "over". But I think it's cool, and that is my own "word."
The top black paper, and second brown designs are die cuts.

Monday, August 22, 2011


I used some paper from Fancy Pants for this week's M&T. It is from Rusted Sun series and it reminds me of the "in between" period of summer and fall seasons. The card was made with Indian Summer, which is appropriate for the end of summer. The page was made using Sunrise (although it is the darker paper.)
The flower punch is actually the Imaginisce Punch for the I Top tool. It really worked well with this paper. If you noticed the small dot like images in the center of the flower (on the card), those are Droplets, from Kaisercraft. Some of the sizes in the package cover the center of the flower and it looks like you added some Glossy Glaze on it. When you come in to do the card, you can choose what size of Droplet you want.
The sunburst punch is a Martha Stewart punch I layered for the center. (Always look for more than one way to use an image punch). The greeting is from Flourishes, Tag Lines.
The faux sewing, on the edges of the card, are a Hero Arts stamp set "Sew Artsy". That set has a sewing machine, thread and some cute greetings in it.

Saturday, August 13, 2011

Artist Trading Cards


Don't forget to stop in today (August 13th.) to do a M&T with Kimmay for the ATC's. Here are a few more samples of what she and Wrenna have done.
10 am to 4 pm is also Stamping Group Day. This is the perfect time to come in and finish (or start) a new stamping project. Stop by or stay all day, it's only $3.00

Impression Obsession has arrived


When Mary and I returned from CHA we were smitten with the background stamps from Impression Obsession, and decided to get some of the "rocking" blocks called Mega Mount.
There are so many beautiful background stamps to use with the block that it was difficult to decide what not to get! Well we need to place another order, as they are practically "walking out the door". They arrived today and I did get this photo before we put them out. Of course with a Late Create tonight (yes, that is why I am blogging this late), the blocks are gone and several backgrounds.
Tomorrow (which is actually already here), is Saturday Stamping. So don't miss out coming in to get a few of these wonderful background stamps. We are placing another order Monday, so if there are some you like, let us know. We were good and only opened one to keep. (But our resistance may not last).

Paper roses from "scrap tissue"


Have you ever had a pretty bag or some tag from clothing that you knew would make a nice card or page? When I took my son shopping for shoes I noticed this pretty tissue in the box, that had some soft writing on it. Which is not why I bought those shoes, by the way. But I took the tissue into the studio and die cut layers of it with a new Sizzix die cut (I got free at CHA)!!
Here is a clip of what it looked like on the page I made. The tissue is beside it, so you can see what it started out as. I distressed it a bit with some Spun Sugar and then spritzed some Frost Shimmer onto it. The paper is a Basic Gray.

Monday, August 8, 2011

M&T for Artist Trading Cards


This Saturday we have 2 things going on. The first is Stamping Day. Come work on your current stamping project from 10am to 4pm for $3.00 A spinner card demo will be offered.

Also we have the Artist Trading Cards (ATC), M&T from Kimmay all day. If you have never made an ATC, then come on in and do one with her. They are smaller than an actual card ( but you could add them to one). The original idea was to trade and keep them, like you would any kind of collectable. Kimmay has the rules, so join us to learn more.
We are starting an ATC Club and this is your opportunity to see what it's all about. The Club will meet once a month to trade, and you can sign up this Saturday. Join us for some creativity.
Here are a few samples done by Kimmay and Wrenna Long.

Tuesday, August 2, 2011

Shop Hop M & T, Tag

Shop Hop is here.......... August 1st. through 15th. Check each store's hours before traveling too far. Also have your passport stamped at each stop, for a chance to win the Grand Prize.

This week is the start of Shop Hop and there are 8 stores you can visit and purchase from, that are included in your passport. If you don't have your passport yet, it is well worth the $5.00, which gets you a free M&T at each store, 20% off your purchase and a chance to win prizes.
This is our Shop Hop tag M & T.
The tag can be used to complete a card or page when you get home. You can do it vertical or horizontal and it only takes a few minutes to do. Please remember to bring your passport, so you can make this! Only people holding passports for the Shop Hop are eligible to do this M&T.
The paper is Basic Grey, the Liquid Pearls are Buttercup- by Ranger, EK Success edger punch,
gold Uni-Ball pen, and wreath from Flourishes stamps.

M&T week of August 2nd.


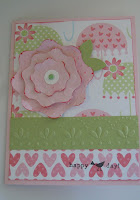
We have a "regular" weekly M&T this week, which is this one. Easy enough to do and $2.00 each
Three Bugs in a Rug is the April Showers paper. Yes, it's later than April, but still cute paper.
This flower die cut is the one I got at CHA in class. So nice to make those scrunched up multi layered flowers.
The green strip I used the new Cuttlebug embossing folder I also got at CHA in class.
(I also cut blue kits , if you need one for a boy).